
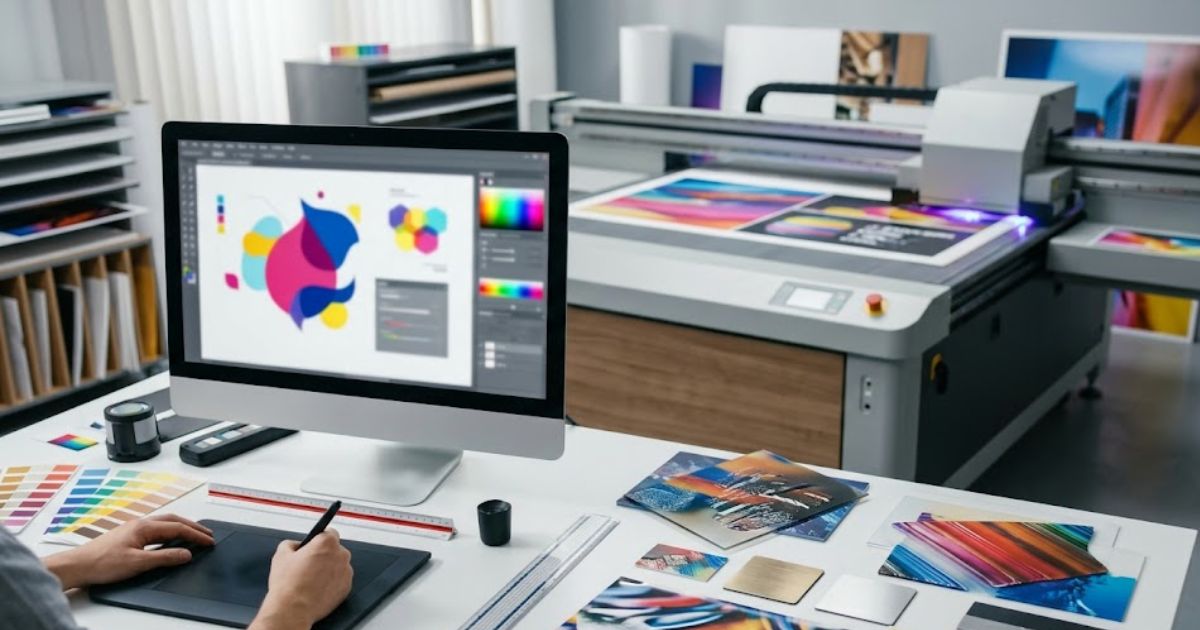
Getting files wrong ruins prints before ink even hits the surface. Proper UV printing file preparation means your print ready file drops every layer exactly where it belongs. A solid file includes the right format, sharp resolution, correct color mode, bleed settings, and properly tagged ink layers.
UV printers spit out artwork exactly as you send it with zero auto fixes. Sloppy UV printing artwork setup leads to weird color shifts, stuff landing in wrong spots, and messed up white or varnish layers. This wrecks promotional product printing, packaging jobs, custom merch, and sign work fast.
A proper UV print ready file packs vector or high raster graphics sized to final dimensions. CMYK color setup plus spot channels for white ink or varnish keep things tight. Folks working in Adobe Illustrator, Adobe Photoshop, or CorelDRAW need to nail the artboard size and layer names. RIP software reads these layers and turns them into printer commands spot on.
For complex product printing jobs, machines like Visual Positioning UV Printers use camera systems to lock artwork onto tricky shapes perfectly.
UV Printing File Requirements
Which File Formats Work Best for UV Printing?
Wrong file types cause missing layers and color headaches. Top UV printing file formats include PDF, AI, EPS, TIFF, and PSD.
| Format | Software Source | Use Case |
| PDF Print Ready | Adobe Suite | Industry go to |
| AI | Adobe Illustrator | Vector art |
| EPS | Illustrator or CorelDRAW | Scalable stuff |
| TIFF | Photoshop | High res photos |
| PSD | Photoshop | Layered work |
Vector formats crush it for logos, text, and crisp edges. Lines stay sharp at any size without getting fuzzy. This matters big time for gold effect UV printing and tiny metallic details.
Most pro RIP systems grab layered PDF or AI files straight up. Flattened files kill spot layers you need for varnish or white channels. Always export with layers alive to keep printing data intact.
What Resolution Should UV Printing Files Use?
Low-res images look like garbage once printed on hard materials. UV print file requirements call for 300 DPI resolution at the final print size for crisp output.
DPI vs PPI Breakdown:
- DPI (Dots Per Inch) means actual ink dots hitting the substrate
- PPI (Pixels Per Inch) means digital image pixel count
- For UV printing artwork preparation, both should sit at 300 for regular jobs
Resolution by Job Type:
| Print Type | Resolution | Viewing Distance |
| Product printing | 300 DPI | Up close |
| Large signs | 150 DPI | 1-3 meters back |
| Billboards | 72-100 DPI | 5+ meters away |
| Micro text and textures | 600 DPI | Super close looks |
Raster vs Vector Stuff:
- Raster images like photos and textures need resolution matching final size
- Vector graphics blow up forever without losing quality
- Turn text to outlines to keep vector sharpness locked in
- Big format scaling chops effective DPI down
Always size artwork before exporting. Blowing up low-res images after design won’t fix anything. A 150 DPI image scaled to 200% drops to 75 DPI effective resolution.
Which Color Profiles Ensure Accurate UV Printing?
RGB colors look fine on screens but bomb in print. UV printers run CMYK ink systems so CMYK files become mandatory for colors you can predict.
| Color Mode | Usage | Print Suitability |
| RGB | Screens only | Skip it |
| CMYK | Print production | Must have |
RGB files shift weird during RIP conversion and throw unexpected tones. CMYK gives you stable color and reliable matching every time.
Solid CMYK Profiles:
- US Web Coated SWOP v2
- FOGRA39 (European shops use this)
- ISO Coated v2
- Japan Color 2001 Coated
Spot Color and Pantone Stuff:
Pantone colors need extra attention in the UV printer file setup:
- Convert Pantone to the closest CMYK match when the exact color isn’t critical
- Use spot color channels for brand colors that must match dead on
- RIP color mapping sends spot colors to specific ink channels
- Some RIP systems handle Pantone matching with expanded gamut printing
RIP Color Mapping Steps:
- RIP reads embedded color profile
- Converts colors to printer specific ink values
- Maps spot channels to white, varnish, or special inks
- Applies color correction curves for substrate type
Getting color right prevents reprints and trashed materials.
What File Size Limits Apply to UV Printing?
Huge files choke RIP processing and slow everything down. Knowing the UV print file requirements for size keeps the workflow smooth.
Max File Size Notes:
- Most RIP systems handle files up to 2-4 GB without breaking a sweat
- Files over 4 GB might throw memory errors
- Network transfer limits affect upload speeds
Shrinking Big Graphics:
- Use LZW compression for TIFF files without killing quality
- Downsample images past 300 DPI at the final size
- Split giant signage into tiled pieces
- Link external images instead of embedding when files get chunky
RIP Memory Tips:
- Complex files with tons of layers eat more memory
- Flatten extra layers, but keep spot channels alive
- Simplify vector paths with crazy anchor points
- Dump hidden layers and unused swatches before export
Why Must Fonts Be Converted to Outlines?
Missing fonts make text jump around or swap to ugly substitutes. Font handling mistakes rank as top UV printing artwork preparation problems.
Converting Fonts to Outlines:
- Select all text objects in your design
- Hit Type > Create Outlines in Illustrator or Convert to Curves in CorelDRAW
- Double check all text converted by checking font usage
- Save a separate editable version before converting
When to Convert:
- Always convert before final PDF export
- Convert when shipping files to outside printers
- Convert fancy or weird typefaces
When to Skip Converting:
- Working files that need text edits later
- Super small text under 6pt that might lose detail
- Files staying inside your own workflow
Other Options:
- Package fonts with the file using Adobe Package
- Embed fonts in PDF export settings
- Send font files separately with clear licensing info
Converting to outlines remains the safest bet for UV print ready files because it kills all font dependency headaches.
Layout Settings
How Do Bleed and Margin Settings Prevent Printing Errors?
Missing bleed margins leave white edges after cutting rigid materials. UV printing designs need 3-5 mm bleed margins past the final trim size.
Bleed stops exposed substrate edges when trimming panels or packaging. Full coverage stays solid even with tiny alignment shifts.
Correct Layout Structure:
- Bleed area: 3-5 mm past trim where background extends
- Trim line: Final cut spot
- Safe area: 3-5 mm inside trim for important content
Set bleed in Adobe Illustrator bleed settings or CorelDRAW page setup before exporting. Always confirm trim dimensions match the actual substrate size.
Common Bleed Screw ups:
- Sticking important text too close to the trim edge
- Forgetting to push background images into the bleed
- Using the wrong trim size for substrate dimensions
Special Ink Layers
How Are White Ink Layers Prepared for UV Printing?
Dark and see through materials need opacity under color layers. White ink layers build opacity and color pop on glass, acrylic, metal, and plastics.
White Ink Workflow:
MTuTech production notes for UV printing applications
For buyers comparing UV printing applications options, the strongest ranking signal is not only the definition of the process. The page should also explain machine fit, production limits, material behavior, ink or fixture requirements, and the next page a buyer should read before requesting a quote.
Best machine fit
Use this guide together with UV Printer when the job requires stable UV output, repeatable setup, and production-ready print quality. If the work involves different shapes, materials, or order sizes, compare it with Flatbed UV Printer 2513 before choosing the final printer.
Production checklist
- Confirm the printable area, part height, and fixture or rotary requirements before quoting the job.
- Match ink, primer, and curing settings to the substrate so adhesion and scratch resistance are predictable.
- Standardize artwork preparation, white ink layers, and test prints before moving into batch production.
- Track production cost by ink use, setup time, rejects, and finishing steps instead of looking only at printer price.
Related MTuTech resources
FAQ
Which MTuTech printer should this article connect to? The best next page depends on the material, shape, and production volume. Flat products usually start with UV printer or UV Printer 9060 pages, while bottles, tumblers, and round products should connect to rotary, cylinder, tumbler, or cylindrical printer pages.
What should buyers check before ordering? Buyers should confirm print size, material compatibility, white ink needs, fixture design, curing performance, maintenance expectations, and whether the workflow supports repeatable production rather than one-off samples only.
- Create a spot color channel named White
- Set correct overprint settings
- Place white layer beneath CMYK artwork
- Export layered PDF or AI file
White ink cranks brightness, pumps contrast, and boosts metallic simulation. It backs spot metallic UV printing and accurate color on dark stuff.
Equipment like the Flatbed UV Printer 9060 Pro handles white ink layers with precision on all kinds of substrates.
Advanced White Ink Tricks:
| Technique | Description | Application |
| Underbase | White prints first, color lands on top | Standard dark and clear materials |
| Sandwich | Color, white, color sequence | Max opacity and punch |
| Overprint white | White prints over colors | Highlight effects |
White Ink Choke Settings:
- Choke shrinks the white layer slightly smaller than the color art
- Stops white edges from peeking around colored objects
- Typical choke: 0.2-0.5 mm depending on printer resolution
- RIP software handles choke automatically when set up right
White Opacity Control:
- Single pass white gives roughly 60-70% opacity
- Double pass bumps opacity to 85-95%
- Triple pass nails near complete coverage on super dark substrates
- Opacity needs depend on substrate color and desired pop
Double pass white printing cranks the opacity for glass and clear acrylic signs. RIP software handles the white channel separately during print runs.
How Are Varnish Layers Configured in UV Printing Files?
Spot varnish drops gloss or matte coating on selected design spots. It uses a separate print layer to build texture or highlight effects.
Common uses include logo pop, embossed looks, and premium packaging finishes. Varnish also pumps UV printer metallic finish perception through gloss contrast.
Varnish Prep Steps:
- Create a spot color named Varnish.
- Place varnish shapes above the design layer
- Use 100 percent spot color fill
- Export file with layers intact
Varnish height controls gloss punch and light reflection strength. Multiple passes build thickness and that tactile feel buyers love.
RIP Workflow
How Does RIP Software Process UV Printing Files?
RIP software turns design files into printer commands. It manages color, white layers, varnish mapping, and printhead sequencing.
Common systems include Onyx RIP, Caldera RIP, Ergosoft RIP, and ColorGATE RIP. These platforms read spot channels and route them to correct ink channels.
RIP Handles:
- Color management conversion
- Layer interpretation
- White ink processing
- Varnish layer mapping
- Print resolution control
Preflight within RIP checks the file structure before printing starts. This step catches production mistakes early.
What Is Preflight Checking in UV Printing Workflows?
Preflight checking scans files before printing kicks off. It spots missing fonts, low-res images, wrong color modes, and misplaced layers.
Typical Preflight Checks:
- Verify resolution hits minimum requirements
- Confirm CMYK color mode throughout
- Check bleed margins extend right
- Catch missing linked images
- Validate spot layer naming
Use Adobe Acrobat Preflight or Illustrator Package function for verification. Always fix errors before shipping files to the printer.
Common File Preparation Mistakes
Which Errors Cause Failed UV Prints?
Common screw ups lead to rejected jobs and wasted materials. RGB color mode instead of CMYK remains the most frequent problem.
Frequent Problems:
- RGB color mode is causing weird color shifts
- Missing white ink layers on clear substrates
- Wrong or missing bleed margins
- Low-res images look pixelated
- Flattened layers killing varnish data
- Unconverted fonts are causing text disasters
- Oversized files are choking RIP memory
Stop errors by following a clear checklist. Run preflight verification and export proper print ready PDF files every single time.
Complete UV Printing File Checklist
A solid checklist cuts production delays and expensive mistakes.
Design Prep:
- Use CMYK color mode
- Set 300 DPI resolution at final size
- Include 3-5 mm bleed margins
- Convert fonts to outlines
- Verify Pantone conversions
Layer Setup:
- Create a white ink spot layer named White.
- Create a varnish spot layer named Varnish.
- Label all layers correctly
- Apply the appropriate choke to the white layer
File Export:
- Export print ready PDF with layers
- Embed all images
- Keep vector graphics intact
- Verify file size within RIP limits
- Run preflight check before submission
Following this checklist keeps the workflow smooth and output consistent.
Additional Considerations
Visual Positioning for Irregular Objects
Weirdly shaped objects create alignment headaches during printing. Visual positioning UV printers use camera recognition systems to lock artwork precisely on phone cases, promo products, and industrial parts.
Standardizing File Submissions
Print shops share file submission guidelines to cut errors and speed production. Common methods include downloadable templates, PDF spec sheets, and automated preflight approval systems.
FAQs
What file formats are best for UV printing?
PDF print ready, AI, EPS, TIFF, and PSD work best. Use layered PDF or AI to keep white and varnish spots intact. Vectors handle logos while TIFF crushes it for photos.
What resolution should UV printing files use?
Shoot for 300 DPI at the final size for sharp output. Drop to 150 DPI for signage and crank to 600 DPI for micro text. Scale raster images before export since vectors scale forever.
How do I prepare white ink layers for UV printing?
Build a White spot channel beneath CMYK and set the overprint correctly. Export as layered PDF or AI. Use a 0.2-0.5mm choke and double passes for 85-95% opacity on dark stuff.
Should I use CMYK or RGB for UV printing files?
Always CMYK with SWOP or FOGRA39 profiles. RGB shifts weird in RIP and causes color surprises. Convert Pantone to CMYK or spots for predictable ink mapping.
What are common mistakes in UV printing file preparation?
RGB mode, missing white layers, skipped bleed, low DPI, unconverted fonts, and oversized files over 4GB cause the most grief. Preflight check catches these before they wreck your job.
Get Professional UV Printing Support
Stuck optimizing files for production? Our tech crew at MTuTech Printers walks you through complete UV printing file preparation workflows for tricky jobs. Packaging, signage, specialty items, and proper file setup mean flawless results every run. Check out the full printer lineup at MTuTech Printers and find advanced systems built for precision output. Our team helps you nail every job the first time around.