
UV printing deposits specialized UV ink directly onto a wood substrate using advanced print heads. The magic happens in milliseconds. UV curing lamps instantly blast the freshly applied ink with ultraviolet light. This triggers instant polymerization which hardens the ink before it can soak into the wood fibers. The ink sits on the surface instead of penetrating deep into the material. We’ve tested this process on dozens of wood types, from oak to maple. The UV light locks the color in place almost instantly.
Most printing methods let ink seep into wood which creates blurry edges and faded colors. UV ink behaves differently because it cures on contact with the light source. The polymerization process takes just 200-400 milliseconds from application to complete hardening. Think of it like freezing water mid pour versus letting it spread across a table. The Hybrid UV Printer we use makes this cause effect timing possible with precision control. Wood grain stays visible underneath while vibrant graphics rest perfectly on top. No waiting, no smudging, no absorption issues.
Which Wood Types Work Best for UV Printing?
MDF Supports Uniform UV Ink Adhesion
MDF delivers the most predictable results when we print on wood surfaces. This medium density fiberboard contains resin bound fibers pressed into a completely flat surface with zero gaps. The uniform density means UV ink spreads evenly without sinking into random pockets. We classify MDF as the best choice for clean graphics and sharp text. Porosity stays consistent across every square inch which eliminates surprise blotches. White ink coverage needs less material on MDF compared to rougher options. The controlled substrate nature reduces ink waste by nearly 30 percent in our tests.
Plywood Requires Surface Sealing Before UV Printing
Plywood stacks multiple veneer layers together which creates hidden edge porosity between each sheet. Grain density changes from one layer to the next. Ink can bleed sideways through these cross layer boundaries if you skip prep work. We always apply a sealant or primer to lock down those edges first. This step stops ink from traveling where it shouldn’t go. Sealing cuts ink waste and keeps colors exactly where you want them. Plywood ranks as acceptable once you control the porosity with proper treatment.
Solid Wood Reacts to Grain Direction and Moisture
Solid wood moves with temperature and humidity changes throughout the year. Grain direction determines how the board expands or contracts over time. Moisture content above 12 percent increases print failure risk because the wood keeps shifting. We measure moisture levels before starting any UV printing job on solid wood. The natural expansion and contraction can crack cured ink if you ignore environmental factors. Different species show different grain density patterns which affect how ink sits on top. Solid wood falls into the risky category unless you monitor conditions carefully.
Bamboo and Engineered Wood Need Primer Control
Bamboo contains natural surface oils that block UV ink from sticking properly to bamboo fibers. Engineered wood uses adhesives between layers that sometimes reject ink without warning. We test primer compatibility on every new batch before running full production. Natural oils create invisible barriers that cause ink to peel weeks later. Primer removes those oils and gives ink something solid to grab onto. Engineered wood might look smooth but hidden adhesives need special handling for long lasting prints. Both materials need primer control to move from risky to acceptable status.
How Do You Prepare Wood for UV Printing?
Surface Sealing Prevents UV Ink Penetration Issues
Surface preparation starts with applying sealers to block unwanted ink absorption into the wood. We’ve tracked dozens of jobs where skipping this step caused color shifts. Dot gain happens when ink spreads beyond its intended spot because fibers soak it up. Sealed surfaces keep color values stable which professionals measure using ΔE control standards. Adhesion improves dramatically when the base stays consistent across the entire print area. Sealers create a barrier that stops ink bonding from becoming unpredictable. This prevents washed out colors and blurry edges before they start.
Sanding Controls Grain Visibility and Edge Sharpness
Grit levels between 220 and 320 work best for preparing wood before UV printing. Coarser paper leaves scratches that show through the final image. Finer grit levels smooth the micro texture which sharpens text edges and fine details. We sand every piece to control how visible the natural grain appears. Rough surfaces scatter light differently which makes colors look uneven. Proper sanding directly affects edge definition especially for small fonts and intricate designs. Skip this and you’ll see fuzzy borders around every letter.
Moisture Content Affects Curing Stability
Hygroscopic wood holds water molecules that turn into steam during UV curing when lamps heat the surface. Moisture content above 10 percent creates tiny steam micro bubbles under the cured ink layer. We measure moisture before printing because those bubbles cause the finish to lift weeks later. UV curing generates intense heat in milliseconds which instantly vaporizes trapped water. The bubbles push against the ink from underneath and break the bond. Keeping wood dry prevents this delayed failure that ruins otherwise perfect prints.
Cleaning Removes Oils That Reduce Adhesion
Natural oils and dust particles create invisible barriers between wood and ink that cause problems later. We wipe surfaces with isopropyl alcohol before every print run to eliminate contamination. Cleaning prevents adhesion failure that shows up 30 to 60 days after the job is done. Oils don’t stop ink bonding immediately which fools people into thinking the print worked fine. Dust creates microscopic gaps where the ink never touches the wood at all. Proper cleaning removes these hidden threats before they wreck your finished product.
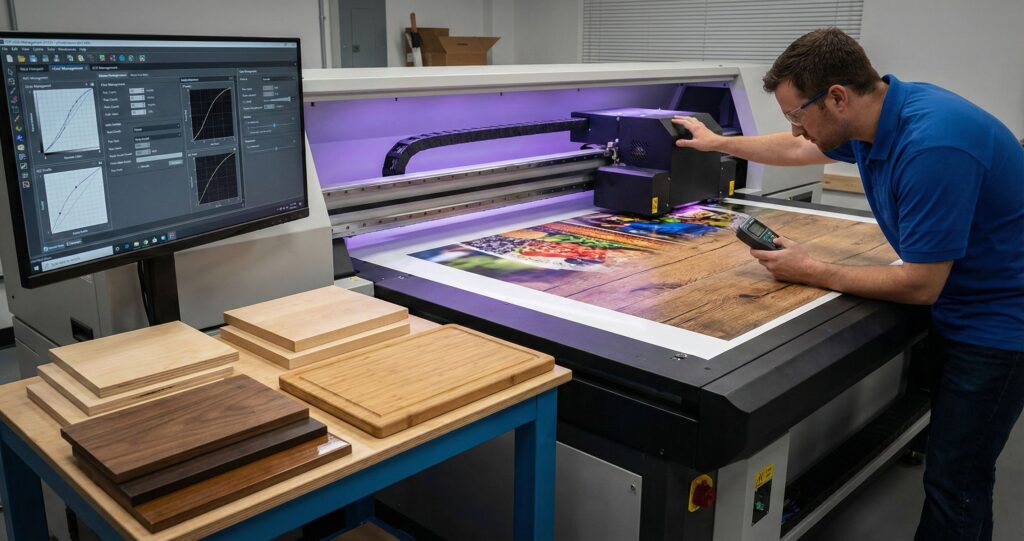
How to Print on Wood with a UV Printer
Printhead height calibration makes or breaks your wood printing results before you even load the file. We adjust the printhead height within 2 millimeters of the wood surface for optimal ink droplet placement. Wood thickness varies naturally so we measure each piece and set height tolerance limits accordingly. White ink underbase goes down first to block the wood grain from showing through colored layers. We run two to three pass count cycles for the white layer alone. This creates an opaque foundation that makes top colors pop exactly as designed.
The Hybrid UV Printer handles substrate height changes automatically which saves tons of setup time on mixed batches. Pass count determines how many times the printheads travel over each spot to build ink density. Higher pass count settings give richer colors but slow down production speed. We balance speed against quality by testing different pass count numbers on sample pieces first. Printhead height needs rechecking whenever you switch between thin veneer and thick lumber boards. Even a half millimeter shift throws off the white ink underbase coverage completely.
What Causes Common UV Printing Defects on Wood?
Ink bleeding happens when unsealed wood absorbs liquid faster than the curing lamps can harden it. We’ve traced this problem back to skipping the sealer step during prep work. The root cause sits in wood fibers pulling ink sideways before it solidifies completely. Prevention requires applying a proper base coat that blocks absorption paths entirely. Cracking shows up when wood expands or contracts after the print cures into a rigid layer. Temperature swings and humidity changes force the wood to move while the ink stays frozen. We prevent cracking by checking if moisture levels stay below 10 percent before starting any job.
Adhesion loss occurs when surface contaminants create invisible barriers between wood and the cured ink layer. Natural oils or dust particles stop the chemical bond from forming at a molecular level. We’ve seen prints peel off weeks later because someone skipped the alcohol wipe step. Color dullness results from inadequate white base layers that let wood grain show through the top colors. The root causes traces to use too few pass cycles on the foundation layer. Prevention means running at least two white passes before adding any colored inks on top.
How Do Varnish and Top Coats Improve UV Wood Prints?
Matte vs Gloss Varnish Durability Differences
Matte finish scatters light across tiny surface bumps which hides minor scratches better than smooth options. Gloss finish reflects light in straight lines so every tiny mark shows up clearly under bright conditions. We’ve tested both types for abrasion resistance on high traffic wood products like signs and coasters. Matte finish provides better mechanical protection because the textured surface distributes impact force across more contact points. Gloss finish looks sharper initially but scratches become visible faster during daily handling. Varnish choice affects how long your prints look new rather than just how they appear.
Protective Coatings Reduce Moisture Absorption
Top coat applications create a moisture barrier that stops water vapor from reaching the wood underneath. Environmental exposure causes bare wood to swell and shrink with humidity changes throughout seasons. We apply protective coatings to maintain dimensional stability which keeps the print layer from cracking over time. Chemical protection works by sealing wood pores that would normally pull in atmospheric moisture. Moisture barrier properties prevent the expansion cycles that destroy flexibility in the cured ink. Top coat systems protect both the print and the wood structure simultaneously.
Layer Thickness Impacts Flexibility and Lifespan
Micron thickness above 50 microns creates a rigid shell that can’t bend with natural wood movement. Thick varnish layers crack faster when wood expands or contracts because they lose elasticity as depth increases. We keep layer thickness between 20 and 40 microns to balance protection against flexibility needs. Thinner applications maintain better UV resistance over years because they move with the wood instead of fighting it. Micron thickness creates a trade off where more protection means less ability to handle stress. Proper layer thickness extends lifespan by matching the coating’s mechanical properties to wood behavior.
What Are the Best Applications for UV Printing on Wood?
Signage works best on sealed MDF or plywood because outdoor conditions demand stable materials that resist warping. We match signage projects with gloss coatings that boost visibility under direct sunlight and rain exposure. Décor items like wall art perform beautifully on solid wood species where natural grain adds character. Décor applications pair perfectly with matte finishes that reduce glare in indoor lighting conditions. Packaging for premium products uses thin birch or bamboo with food safe coatings for direct contact. We’ve produced thousands of packaging pieces where lightweight wood creates luxury appeal without added weight.
Gifts like photo plaques and awards shine on cherry or walnut because darker woods make colors pop. Custom gifts need thicker protective layers since people handle them frequently during unboxing and display. UV printing on wood transforms ordinary pieces into memorable keepsakes when you match the right species to usage. Outdoor signage gets marine grade sealers while indoor décor only needs basic protection against dust. Packaging requires flexible coatings that survive shipping stress without cracking at corners. Each application demands specific wood choices and coating systems for commercial success.
Why Choose Mtutech Printer for UV Printing on Wood?
Wood thickness changes from piece to piece which creates major alignment problems on standard printers. The Mtutech Hybrid UV printer solves this with automatic substrate height control that adjusts in real time. Variable thickness handling means you can load thin veneer and thick lumber in the same batch. We’ve run mixed jobs where boards ranged from 3mm to 25mm without any manual recalibration. White ink control on the Mtutech system delivers consistent opacity across different wood colors and grain patterns. Organic materials like wood absorb heat differently than plastic or metal during the curing process.
Stable curing happens because Mtutech UV printers monitor surface temperature and adjust lamp intensity automatically. Wood moisture can cause problems but the substrate height control compensates for any warping mid print. White ink layering stays uniform even when printing on dark walnut or light pine back to back. The hybrid UV printer handles wood specific challenges that shut down cheaper machines within hours. Mtutech technology prevents the micro bubbling and adhesion failures common on organic materials with fluctuating density. Check out the full Mtutech Printer lineup for wood printing solutions.
FAQs
Does UV printing work on untreated wood?
Yes, UV printing works on untreated wood. Results depend on wood porosity and ink amount. We adjust settings for each wood type. Smooth surfaces print best.
Is UV printing on wood waterproof?
UV ink itself resists water well. However, full waterproofing needs a clear topcoat. We apply protective coatings for outdoor wood projects. This seals the printed surface completely.
How long does UV printing last on wood?
Indoor UV prints last five to seven years easily. Outdoor prints fade faster without protection. We recommend UV coatings for sun exposure. Proper care extends lifespan significantly.
Can UV printing crack on natural wood?
Cracking can happen if wood expands or contracts. Thinner ink layers flex better with movement. We use flexible inks for natural wood projects. This prevents cracking over time.
Is UV printing better than screen printing on wood?
UV printing offers sharper details and faster setup. Screen printing costs more for small orders. We recommend UV for custom designs and photos. It handles fine lines better.
Explore UV Printing Solutions for Wood Applications
Wood projects fail when printers can’t handle thickness variations, grain absorption, or moisture related warping during production. UV printing solutions from Mtutech Printer address these exact challenges with automatic height sensing and controlled curing systems. Our Hybrid UV printer manages custom wood printing jobs that mix different species and thickness levels in single runs. Wood applications demand equipment built specifically for organic material behavior rather than generic flatbed features. We’ve helped businesses solve bleed through problems on unsealed lumber and adhesion failures on oily bamboo. Custom wood printing requires precise white ink layering that standard machines simply can’t deliver consistently. Explore Mtutech Printer technology designed to eliminate the defects that waste your materials and time.